No edit summary |
mNo edit summary |
||
| (40 intermediate revisions by 14 users not shown) | |||
| Line 1: | Line 1: | ||
| + | <gallery type="slideshow" widths="300" align=right> |
||
| − | {{stub}} |
||
| + | BookI-1-1.jpg |
||
| + | BookI-1-3.jpg |
||
| + | BookI-2-2.jpg |
||
| + | BookI-2-6.jpg |
||
| + | BookI-3-1.jpg |
||
| + | BookI-3-3.jpg |
||
| + | BookI-3-4.jpg |
||
| + | BookI-3-7.jpg |
||
| + | BookI-4-1.jpg |
||
| + | BookI-7-1.jpg |
||
| + | BookI-7-12.jpg |
||
| + | BookI-7-7.jpg |
||
| + | BookI-7-8.jpg |
||
| + | BookI-whatyouneed.jpg |
||
| + | BookI.jpg |
||
| ⚫ | |||
| + | '''Book binding''' is a great way to add your personality and craftsmanship into a book or journal. It can be used to improve the presentation of your work or increase your connection with a personal journal. |
||
| ⚫ | This method teaches you how to make a book out of paper that has already been used on one side, however the technique could easily be adapted to use new paper. Binding your own book is not as hard as you think, follow these book binding steps and you'll be well on your way to creating your own special book. |
||
| − | IMAGES COMING SOON |
||
| − | |||
| − | = Method I = |
||
| ⚫ | |||
| ⚫ | |||
| ⚫ | |||
| + | ''(More images are forthcoming!) '' |
||
| − | == |
+ | == Materials & Tools Needed == |
<gallery> |
<gallery> |
||
Image:bookI-whatyouneed.jpg |
Image:bookI-whatyouneed.jpg |
||
| Line 22: | Line 35: | ||
*plastic bag |
*plastic bag |
||
*large [[binder clip]] |
*large [[binder clip]] |
||
| − | *thick [[cardboard]] ( |
+ | *thick [[cardboard]] (e.g. old cardboard box) |
*fabric for cover (nice-looking fabric) |
*fabric for cover (nice-looking fabric) |
||
| ⚫ | |||
| − | |||
| ⚫ | |||
<gallery> |
<gallery> |
||
| − | Image:bookI-1-3.jpg|1. |
+ | Image:bookI-1-3.jpg|1. Fold each piece of paper in half, and in half again. Bundle into groups of three. |
| − | Image:bookI-2- |
+ | Image:bookI-2-10.jpg|2. Sew each little bundle of three along the fold. |
| − | Image:bookI-3- |
+ | Image:bookI-3-6.jpg|3. Glue the spine of the bundles to a piece of fabric, clamp with the binder clip, and allow to dry completely. |
| − | Image:bookI-4- |
+ | Image:bookI-4-1.jpg|4. Cut the cover-cardboard and cover-fabric to size. |
Image:bookI-5-3.jpg|5. Glue the spine-protector to the cover fabric. |
Image:bookI-5-3.jpg|5. Glue the spine-protector to the cover fabric. |
||
Image:bookI-6-5.jpg|6. Attach the cover-cardboard. |
Image:bookI-6-5.jpg|6. Attach the cover-cardboard. |
||
| Line 37: | Line 49: | ||
</gallery> |
</gallery> |
||
| ⚫ | |||
| ⚫ | |||
| ⚫ | |||
| ⚫ | |||
| − | |||
| ⚫ | |||
| ⚫ | |||
Image:bookI-1-1.jpg|1. Fold each page in half so the unwanted-text is hidden. |
Image:bookI-1-1.jpg|1. Fold each page in half so the unwanted-text is hidden. |
||
Image:bookI-1-2.jpg|2. Fold each page in half again. |
Image:bookI-1-2.jpg|2. Fold each page in half again. |
||
| − | Image:bookI-1-3.jpg|3. Slide 3 folded pieces of paper together. Repeat for all the pieces of paper. |
+ | Image:bookI-1-3.jpg|3. Slide 3 folded pieces of paper together; this makes one "bundle". Repeat for all the pieces of paper. |
</gallery> |
</gallery> |
||
| ⚫ | |||
| − | |||
| ⚫ | |||
| − | |||
| + | Note: It doesn't really matter if you don't follow these stitching instructions perfectly, just make it up... do some stitches along the fold line and try to make it look neat, that's really all there is to it. |
||
| ⚫ | |||
| ⚫ | |||
Image:bookI-2-1.jpg|1. Open up each little bundle of pages at the centre page. |
Image:bookI-2-1.jpg|1. Open up each little bundle of pages at the centre page. |
||
| − | Image:bookI-2-2.jpg|2. Lay the bundle of pages, face down on a soft surface ( |
+ | Image:bookI-2-2.jpg|2. Lay the bundle of pages, face down on a soft surface (e.g. carpet). |
Image:bookI-2-3.jpg|3. Thread a sewing needle with cotton thread. Double the thread over and tie a knot in the end. |
Image:bookI-2-3.jpg|3. Thread a sewing needle with cotton thread. Double the thread over and tie a knot in the end. |
||
Image:bookI-2-4.jpg|4. Push the needle through the bundle of pages from the outside of the fold. |
Image:bookI-2-4.jpg|4. Push the needle through the bundle of pages from the outside of the fold. |
||
| − | Image:bookI-2-5.jpg|5. Turn the bundle of pages over |
+ | Image:bookI-2-5.jpg|5. Turn the bundle of pages over, pull the needle and thread through, and then push the needle through the bundle of pages from the inside of the fold. |
| − | Image:bookI-2-6.jpg|6. |
+ | Image:bookI-2-6.jpg|6. Turn the pages over again and loop the needle through the knot at the end of the cotton thread (so the thread is anchored). |
| + | Image:bookI-2-7.jpg|7. |
||
| − | Image:bookI-2-7.jpg|7. Turn the pages over again and loop the needle through the knot at the end of the cotton thread (so the thread is anchored). |
||
| − | Image:bookI-2-8.jpg|8 |
+ | Image:bookI-2-8.jpg|8. |
| − | Image:bookI-2-9.jpg|9 |
+ | Image:bookI-2-9.jpg|9. |
| + | Image:bookI-2-10.jpg|10. Stitch each bundle of pages together in the same manner. |
||
</gallery> |
</gallery> |
||
| + | :-) |
||
| ⚫ | |||
| − | |||
| ⚫ | |||
| − | |||
| ⚫ | |||
| ⚫ | |||
| ⚫ | |||
| ⚫ | |||
Image:bookI-3-2.jpg|2. Clip them together with a big strong stationery clip, on the non-spine side. |
Image:bookI-3-2.jpg|2. Clip them together with a big strong stationery clip, on the non-spine side. |
||
Image:bookI-3-3.jpg|3. Cut a piece of plain fabric the same size as the stack of pages. |
Image:bookI-3-3.jpg|3. Cut a piece of plain fabric the same size as the stack of pages. |
||
| − | Image:bookI-3-4.jpg|4. Put PVA glue along the spine of the pages. Rub it with your finger-tip so that it covers the spine evenly. |
+ | Image:bookI-3-4.jpg|4. Put PVA glue along the spine of the pages. Rub it with your finger-tip so that it covers the spine evenly. |
Image:bookI-3-5.jpg|5. Glue the spine to the middle of the piece of plain fabric. Press the fabric with your finger-tip so that it is firmly against the spine of the pages. |
Image:bookI-3-5.jpg|5. Glue the spine to the middle of the piece of plain fabric. Press the fabric with your finger-tip so that it is firmly against the spine of the pages. |
||
Image:bookI-3-6.jpg|6. Hold the fabric firmly in place, and move the stationery clip to the spine side. |
Image:bookI-3-6.jpg|6. Hold the fabric firmly in place, and move the stationery clip to the spine side. |
||
| − | Image:bookI-3-7.jpg|7. Allow to dry |
+ | Image:bookI-3-7.jpg|7. Allow to dry completely (at least 8 hours). Note: It is important that you really do allow it to dry completely, otherwise the book is likely to fall apart! |
</gallery> |
</gallery> |
||
| ⚫ | |||
| − | |||
| ⚫ | |||
| − | |||
| ⚫ | |||
| ⚫ | |||
Image:bookI-4-1.jpg|1. Cut two pieces of cardboard, just slightly bigger than the stack of pages (4mm higher than the pages and 2mm wider than the pages). |
Image:bookI-4-1.jpg|1. Cut two pieces of cardboard, just slightly bigger than the stack of pages (4mm higher than the pages and 2mm wider than the pages). |
||
| − | Image:bookI-4-2.jpg|2. Cut one piece of cardboard the exact height and width of |
+ | Image:bookI-4-2.jpg|2. Cut one piece of cardboard the exact height and width of the spine of the bundle of pages; this will be the "spine-protector". (see previous image) |
| − | Image:bookI-4-3.jpg|3. Cut a rectangular piece of nice-looking fabric for the cover. |
+ | Image:bookI-4-3.jpg|3. Cut a rectangular piece of nice-looking fabric for the cover. (see previous image) |
</gallery> |
</gallery> |
||
| ⚫ | |||
| − | |||
| ⚫ | |||
| − | |||
| ⚫ | |||
| ⚫ | |||
Image:bookI-5-1.jpg|1. Glue the spine-protector down the centre of the back side of the cover-fabric. |
Image:bookI-5-1.jpg|1. Glue the spine-protector down the centre of the back side of the cover-fabric. |
||
| − | Image:bookI-5-2.jpg|2. Cut out two little "v" shapes from either end of the spine-protector. |
+ | Image:bookI-5-2.jpg|2. Cut out two little "v" shapes from either end of the spine-protector (as shown by the black lines in the diagram), leaving a little rectangular flap at either end. |
| − | Image:bookI-5-3.jpg|3. Glue the |
+ | Image:bookI-5-3.jpg|3. Glue the rectangular flaps of fabric to the spine-protector. |
</gallery> |
</gallery> |
||
| ⚫ | |||
| − | |||
| ⚫ | |||
| − | |||
| ⚫ | |||
| ⚫ | |||
Image:bookI-6-1.jpg|1. Cut a strip of plastic from the plastic bag and place it between the front and back pages of the book and the plain fabric that has been glued to the spine. (This is so the pages don't stick to the pieces of cover-cardboard when you glue them in place). |
Image:bookI-6-1.jpg|1. Cut a strip of plastic from the plastic bag and place it between the front and back pages of the book and the plain fabric that has been glued to the spine. (This is so the pages don't stick to the pieces of cover-cardboard when you glue them in place). |
||
| − | Image:bookI-6-2.jpg|2. Apply glue to half of one side of one of the pieces of cover-cardboard. |
+ | Image:bookI-6-2.jpg|2. Apply glue to half of one side of one of the pieces of cover-cardboard. |
Image:bookI-6-3.jpg|3. Line the cover-cardboard up with the spine, and glue it to the piece of plain fabric. |
Image:bookI-6-3.jpg|3. Line the cover-cardboard up with the spine, and glue it to the piece of plain fabric. |
||
Image:bookI-6-4.jpg|4. Turn over and repeat on the other side. |
Image:bookI-6-4.jpg|4. Turn over and repeat on the other side. |
||
| Line 104: | Line 108: | ||
</gallery> |
</gallery> |
||
| ⚫ | |||
| − | |||
| ⚫ | |||
| − | |||
| ⚫ | |||
| ⚫ | |||
| + | Image:bookI-7-2.jpg|2. Spread the glue so it makes a thin, even layer. |
||
| − | <gallery> |
||
| − | Image:bookI-7- |
+ | Image:bookI-7-3.jpg|3. Line the spine-protector up with the spine and smooth the cover-fabric onto the glue on the cover-cardboard. Pull the fabric tight and smooth out any wrinkles. |
| − | Image:bookI-7- |
+ | Image:bookI-7-4.jpg|4. Apply glue to the outside of the back cover-cardboard. |
| − | Image:bookI-7- |
+ | Image:bookI-7-5.jpg|5. Spread the glue so it makes a thin, even layer. |
| − | Image:bookI-7- |
+ | Image:bookI-7-6.jpg|6. Stretch the cover-fabric tightly, making sure the spine is in the correct position. |
| − | Image:bookI-7- |
+ | Image:bookI-7-7.jpg|7. Smooth the fabric onto the cover-carboard. Note - If the spine-protector it is not tighltly against the spine, try and adjust the cover-fabric before the glue dries. |
| − | Image:bookI-7- |
+ | Image:bookI-7-8.jpg|8. Cut the corners of the cover fabric as shown by the black lines in the diagram. |
| − | Image:bookI-7-7.jpg|7. Make sure the spine-protector is tightly against the spine. If it is not tighltly against the spine, try and adjust the cover-fabric before the glue dries. |
||
| ⚫ | |||
Image:bookI-7-9.jpg|9. Glue the corner flaps of cover-fabric to the inside of the cover-cardboard. |
Image:bookI-7-9.jpg|9. Glue the corner flaps of cover-fabric to the inside of the cover-cardboard. |
||
Image:bookI-7-10.jpg|10. Glue the remaining pieces of cover-fabric to the inside of the cover-cardboard. |
Image:bookI-7-10.jpg|10. Glue the remaining pieces of cover-fabric to the inside of the cover-cardboard. |
||
| + | Image:bookI-7-11.jpg|11. Repeat for the back cover. |
||
| ⚫ | |||
| + | Image:bookI-7-12.jpg|12. Close the book. |
||
| ⚫ | |||
</gallery> |
</gallery> |
||
| − | = See |
+ | == See also == |
| + | '''Objects:''' |
||
| − | [[Bookbinding]] |
+ | *[[Bookbinding]] |
| + | *[[Paper]] |
||
| + | |||
| + | '''Related howto's:''' |
||
| + | *[[Howto make paper]] |
||
| + | |||
| + | '''Guides:''' |
||
| + | |||
| ⚫ | |||
| + | *[http://community.livejournal.com/handmadebooks/375307.html?#cutid1 Coptic stitching tutorial.] |
||
| + | *[http://hubpages.com/_viewpage/hub/Book-Binding-Methods Various book binding methods.] |
||
| + | *[http://stamphenge.wordpress.com/minibooks This page links to several book binding tutorials.] |
||
| + | |||
| + | <div id="wikia-credits"> |
||
| + | <small>From [http://howto.wikia.com HowTo Wiki], a [http://www.wikia.com Wikia] wiki.</small> |
||
| ⚫ | |||
| + | </div> |
||
| + | [[Category:Howto]] |
||
Latest revision as of 14:31, 24 August 2014
Book binding is a great way to add your personality and craftsmanship into a book or journal. It can be used to improve the presentation of your work or increase your connection with a personal journal.
This method teaches you how to make a book out of paper that has already been used on one side, however the technique could easily be adapted to use new paper. Binding your own book is not as hard as you think, follow these book binding steps and you'll be well on your way to creating your own special book.
(More images are forthcoming!)
Materials & Tools Needed
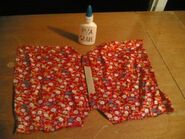
- paper (at least 18 sheets of A4 size office paper that has already been used on one side, i.e. "scrap paper").
- cotton thread
- sewing needle
- scissors
- PVA glue (craft/wood glue)
- fabric for binding (plain fabric)
- plastic bag
- large binder clip
- thick cardboard (e.g. old cardboard box)
- fabric for cover (nice-looking fabric)
Quick Steps
3. Glue the spine of the bundles to a piece of fabric, clamp with the binder clip, and allow to dry completely.
6. Attach the cover-cardboard.
Full Steps
Step 1 - Getting the pages ready
Step 2 - Sewing the signatures (sewing pages into bundles)
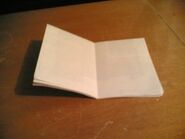
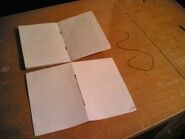
5. Turn the bundle of pages over, pull the needle and thread through, and then push the needle through the bundle of pages from the inside of the fold.
6. Turn the pages over again and loop the needle through the knot at the end of the cotton thread (so the thread is anchored).
:-)
Step 3 - Gluing the signatures along the spine (gluing bundles together)
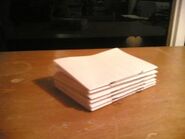
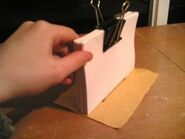
4. Put PVA glue along the spine of the pages. Rub it with your finger-tip so that it covers the spine evenly.
5. Glue the spine to the middle of the piece of plain fabric. Press the fabric with your finger-tip so that it is firmly against the spine of the pages.
Step 4 - Cutting the cover-cardboard and cover-fabric to size
1. Cut two pieces of cardboard, just slightly bigger than the stack of pages (4mm higher than the pages and 2mm wider than the pages).
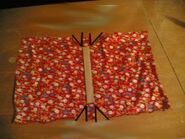
2. Cut one piece of cardboard the exact height and width of the spine of the bundle of pages; this will be the "spine-protector". (see previous image)
3. Cut a rectangular piece of nice-looking fabric for the cover. (see previous image)
Step 5 - Gluing the spine-protector to the cover-fabric
2. Cut out two little "v" shapes from either end of the spine-protector (as shown by the black lines in the diagram), leaving a little rectangular flap at either end.
Step 6 - Attaching the cover-cardboard
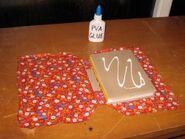
1. Cut a strip of plastic from the plastic bag and place it between the front and back pages of the book and the plain fabric that has been glued to the spine. (This is so the pages don't stick to the pieces of cover-cardboard when you glue them in place).
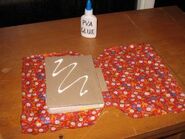
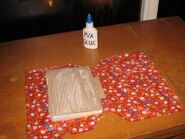
2. Apply glue to half of one side of one of the pieces of cover-cardboard.
3. Line the cover-cardboard up with the spine, and glue it to the piece of plain fabric.
4. Turn over and repeat on the other side.
5. Clamp in place with the stationery clip and allow to dry for approximately 10 minutes.
Step 7 - Covering the book with fabric
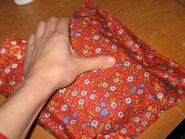
3. Line the spine-protector up with the spine and smooth the cover-fabric onto the glue on the cover-cardboard. Pull the fabric tight and smooth out any wrinkles.
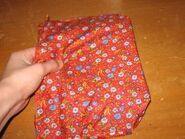
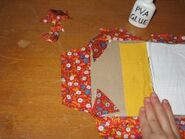
7. Smooth the fabric onto the cover-carboard. Note - If the spine-protector it is not tighltly against the spine, try and adjust the cover-fabric before the glue dries.
See also
Objects:
Related howto's:
Guides:
External links
- Coptic stitching tutorial.
- Various book binding methods.
- This page links to several book binding tutorials.
From HowTo Wiki, a Wikia wiki.


